


队列
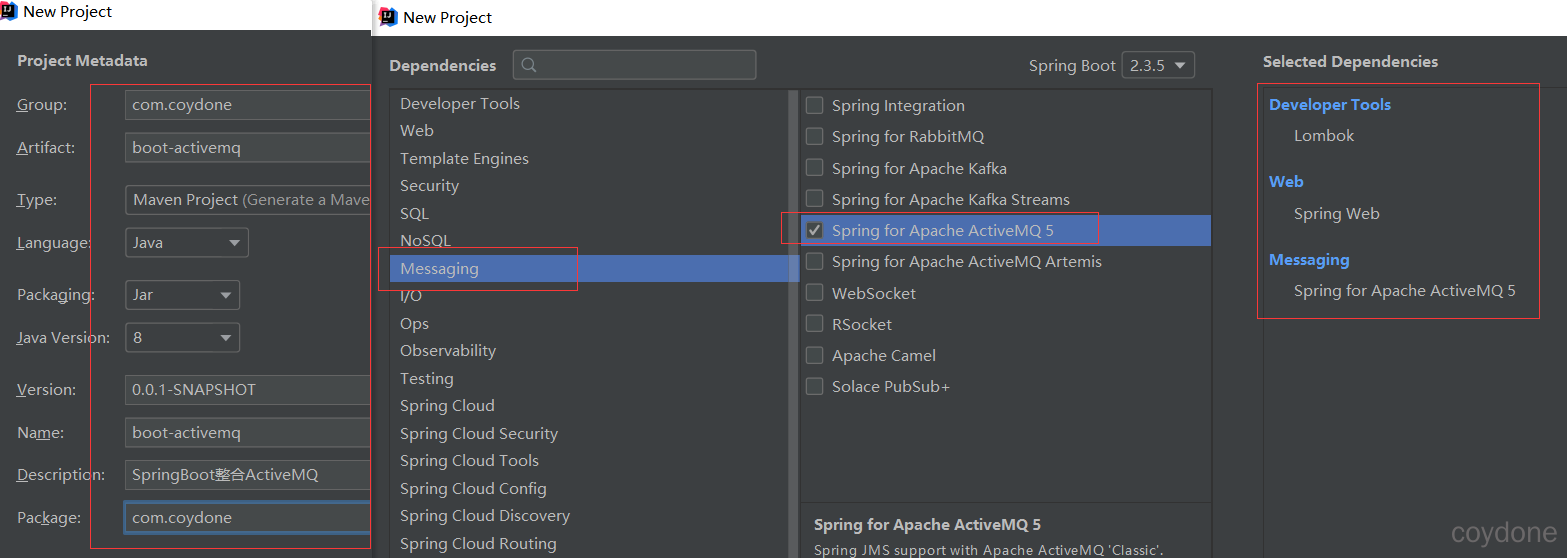
1、创建SpringBoot项目,选择ActiveMQ的环境。
2、修改yaml。
server:
  port: 8080
#设置activemq
spring:
  activemq:
    broker-url: tcp://127.0.0.1:61616
    user: admin
    password: admin
  jms:
    pub-sub-domain: false # false代表队列 true代表主题 默认为false
boot-queue: boot-queue
3、创建配置类。
package com.coydone.config;

import org.apache.activemq.command.ActiveMQQueue;
import org.springframework.beans.factory.annotation.Value;
import org.springframework.boot.autoconfigure.condition.ConditionalOnClass;
import org.springframework.context.annotation.Bean;
import org.springframework.context.annotation.Configuration;

import javax.jms.Queue;

@Configuration
@ConditionalOnClass(ActiveMQQueue.class)
public class ActiveMQConfig {
    @Value("${boot-queue}")
    private String queueName;

    @Bean
    public Queue queue(){
        return new ActiveMQQueue(queueName);
    }
}
4、修改启动类:在启动类上使用@EnableJms开启JMS。
import org.springframework.jms.annotation.EnableJms;

@SpringBootApplication
@EnableJms
public class BootActivemqApplication {
    public static void main(String[] args) {
        SpringApplication.run(BootActivemqApplication.class, args);
    }
}
5、发送。
package com.coydone.controller;

import javax.jms.Queue;
@RestController
@RequestMapping("msg")
public class MsgController {
    @Autowired
    private JmsMessagingTemplate jmsMessagingTemplate;

    @Autowired
    private Queue queue;
    @RequestMapping("send")
    public String send(String msg){
        jmsMessagingTemplate.convertAndSend(queue,msg);

        return "发送成功"+Thread.currentThread().getName();
    }
}
6、接收。
package com.coydone.config;

import org.springframework.jms.annotation.JmsListener;
import org.springframework.stereotype.Component;

import javax.jms.Message;

@Component
public class Receiver {

    @JmsListener(destination = "${boot-queue}" )
    public void reciever1(Message message){
        System.out.println(message);
        System.out.println("reciever1监听器被触发,调用成功"+Thread.currentThread().getName());
    }

    @JmsListener(destination = "${boot-queue}" )
    public void reciever2(Message message){
        System.out.println(message);
        System.out.println("reciever2监听器被触发,调用成功"+Thread.currentThread().getName());
    }
}
7、测试:需要启动ActiveMQ,运行工程,如在浏览器中输入http://localhost:8080/msg/send?msg=hello即可看见效果。
主题
1、创建SpringBoot的项目,添加Activemq的环境。
2、修改yaml。
server:
  port: 8080
#设置activemq
spring:
  activemq:
    broker-url: tcp://127.0.0.1:61616
    user: admin
    password: admin
  jms:
    pub-sub-domain: true # false代表队列 true代表主题 默认为false
boot-topic: boot-topic
3、创建配置类。
@Configuration
@ConditionalOnClass(ActiveMQTopic.class)
public class ActiveMQConfig {
    @Value("${boot-topic}")
    private String topicName;

    @Bean
    public Topic queue(){
        return new ActiveMQTopic(topicName);
    }
}
4、修改启动类:在启动类上使用@EnableJms开启JMS。
5、发送。
@RestController
@RequestMapping("msg")
public class MsgController {
    @Autowired
    private JmsMessagingTemplate jmsMessagingTemplate;
    @Autowired
    private Topic topic;
    @RequestMapping("send")
    public String send(String msg){
        jmsMessagingTemplate.convertAndSend(topic,msg);

        return "发送成功"+Thread.currentThread().getName();
    }
}
6、接收。
@Component
public class Receiver {

    @JmsListener(destination = "${boot-topic}" )
    public void reciever1(Message message){
        System.out.println(message);
        System.out.println("reciever1监听器被触发,调用成功"+Thread.currentThread().getName());
    }

    @JmsListener(destination = "${boot-topic}" )
    public void reciever2(Message message){
        System.out.println(message);
        System.out.println("reciever2监听器被触发,调用成功"+Thread.currentThread().getName());
    }
}
整合队列和主题
上面的两种整合方式都只能要么使用队列,要么使用主题。有时候我们需要结合两者,即需要整合这两种模式。
1、创建SpringBoot项目,选择ActiveMQ的环境。
2、修改yaml。
server:
  port: 8080
#y设置activemq
spring:
  activemq:
    broker-url: tcp://127.0.0.1:61616
    user: admin
    password: admin
#  jms:
#    pub-sub-domain: true  #false代表队列  true代表主题
boot-queue: boot-queue
boot-topic: boot-topic
3、创建配置类。
package com.coydone.config;

import org.apache.activemq.ActiveMQConnectionFactory;
import org.apache.activemq.command.ActiveMQQueue;
import org.apache.activemq.command.ActiveMQTopic;
import org.springframework.beans.factory.annotation.Value;
import org.springframework.boot.autoconfigure.condition.ConditionalOnClass;
import org.springframework.context.annotation.Bean;
import org.springframework.context.annotation.Configuration;
import org.springframework.context.annotation.Primary;
import org.springframework.jms.config.DefaultJmsListenerContainerFactory;
import org.springframework.jms.config.JmsListenerContainerFactory;

import javax.jms.Queue;
import javax.jms.Topic;

@Configuration
@ConditionalOnClass(value = {ActiveMQQueue.class,ActiveMQTopic.class})
public class ActiveMQConfig {

    @Value("${boot-queue}")
    private String queueName;

    @Value("${boot-topic}")
    private String topicName;

    @Value("${spring.activemq.user}")
    private String username;
    @Value("${spring.activemq.password}")
    private String password;
    @Value("${spring.activemq.broker-url}")
    private String  brokerUrl;

    @Bean
    public Queue queue(){
        return new ActiveMQQueue(queueName);
    }

    @Bean
    public Topic topic(){
        return new ActiveMQTopic(topicName);
    }

    @Bean
    @Primary
    public ActiveMQConnectionFactory activeMQConnectionFactory() {
        ActiveMQConnectionFactory activeMQConnectionFactory = new ActiveMQConnectionFactory(username, password, brokerUrl);
        return activeMQConnectionFactory;
    }

    //处理队列的监听工厂
    @Bean
    public JmsListenerContainerFactory<?> jmsListenerContainerFactoryQueue(ActiveMQConnectionFactory factory){

        DefaultJmsListenerContainerFactory defaultJmsListenerContainerFactory=new DefaultJmsListenerContainerFactory();
        defaultJmsListenerContainerFactory.setConnectionFactory(factory);
        defaultJmsListenerContainerFactory.setPubSubDomain(false);//代表队列

        return defaultJmsListenerContainerFactory;
    }

    //处理主题的监听工厂
    @Bean
    public JmsListenerContainerFactory<?> jmsListenerContainerFactoryTopic(ActiveMQConnectionFactory factory){
        DefaultJmsListenerContainerFactory defaultJmsListenerContainerFactory=new DefaultJmsListenerContainerFactory();
        defaultJmsListenerContainerFactory.setConnectionFactory(factory);
        defaultJmsListenerContainerFactory.setPubSubDomain(true);//代表主题
        return defaultJmsListenerContainerFactory;
    }
}
4、修改启动类:在启动类上使用@EnableJms开启JMS。
5、发送。
package com.coydone.controller;

import org.springframework.beans.factory.annotation.Autowired;
import org.springframework.jms.core.JmsMessagingTemplate;
import org.springframework.web.bind.annotation.RequestMapping;
import org.springframework.web.bind.annotation.RestController;

import javax.jms.Queue;
import javax.jms.Topic;

@RestController
@RequestMapping("msg")
public class MsgController {
    @Autowired
    private JmsMessagingTemplate jmsMessagingTemplate;
    @Autowired
    private Topic topic;
    @Autowired
    private Queue queue;

    @RequestMapping("sendQueue")
    public String sendQueue(String msg){
        jmsMessagingTemplate.convertAndSend(queue,msg);
        return "队列发送成功"+Thread.currentThread().getName();
    }

    @RequestMapping("sendTopic")
    public String sendTopic(String msg){
        jmsMessagingTemplate.convertAndSend(topic,msg);
        return "主题发送成功"+Thread.currentThread().getName();
    }
}
6、接收。
package com.coydone.config;
import org.springframework.jms.annotation.JmsListener;
import org.springframework.stereotype.Component;
import javax.jms.Message;
@Component
public class Receiver {
    @JmsListener(destination = "${boot-queue}" ,containerFactory = "jmsListenerContainerFactoryQueue")
    public void reciever1(Message message){
        System.out.println(message);
        System.out.println("reciever1-queue监听器被触发,调用成功"+Thread.currentThread().getName());
    }

    @JmsListener(destination = "${boot-queue}" ,containerFactory = "jmsListenerContainerFactoryQueue")
    public void reciever2(Message message){
        System.out.println(message);
        System.out.println("reciever2-queue监听器被触发,调用成功"+Thread.currentThread().getName());
    }

    @JmsListener(destination = "${boot-topic}" ,containerFactory = "jmsListenerContainerFactoryTopic")
    public void reciever3(Message message){
        System.out.println(message);
        System.out.println("reciever3-topic监听器被触发,调用成功"+Thread.currentThread().getName());
    }

    @JmsListener(destination = "${boot-topic}" ,containerFactory = "jmsListenerContainerFactoryTopic" )
    public void reciever4(Message message){
        System.out.println(message);
        System.out.println("reciever4-topic监听器被触发,调用成功"+Thread.currentThread().getName());
    }
}
7、测试


评论区